Monday, October 31, 2011

Love CardMaking with Digi Stamps

First and foremost, I am very happy to be part of the DT and was so eager to get started I cooked up this little number below tonight!!! I just happen to love digi stamps, they create such a fun, lovely feel to cards that I think everyone enjoys receiving a card with a digi stamp on it. Not only do they look cute but they are fun to color. Now I know everyone loves the copics, however, I am a fashion designer and I learned with prismacolors and I must admit I stick with what I love and I love my prismas. I do have the BIC Markers and I do not find they blend as easily, however they are good to use on areas where you dont have so much blending to do.

Anywho, lets not prolong this any longer, I know you are all dying to see what I created with a Freebie image I got from freedigitalstamps.blogspot.com. Check them out they are amazing and are always giving you the cutest freebie digi stamps out there!!!

Here is my project:
Recipe:
White Cardstock A2
Paper DCWV Whimsy
Owl Digi Image from freedigitalstamps
Sentiment stamp from Inkadinkadoo
Bird on Branch Stamp from Studio G
Rossette Trim from MB's Treasurista 

Hope you enjoy!!!

Happy Craftin!
XoXo, 
Liz


Wednesday, October 26, 2011

Coloring Digi Stamps

Hey guys! My name is Fabiola from Mrs.Sassy Crafter  and I am so thrilled to be a part of the DT. Today I just wanted to share with you a quick video in how to color digi stamps with something else than Copic markers or promarkers. I know we are living in a time where the economy is not as good, and many crafters can't afford expensive markers like Copics or Promarkers. A good alternative to these markers are Bic Mark It markers, they are within a budget (only 19.99 for 36 markers), they work great, and they blend pretty well too, not as good as copics, but hey they do work!
Without further ado there is the video....enjoy!!!!


Digi Stamp Fun!


Good afternoon!

Since it's my first post as part of the design team, I thought that I would go gangbusters with Jennifer's last post about digi (digital) stamps!

LOVE.THEM.

Can't get enough of them,,,,love to use them on my cards especially,,,,,and in addition to all the very good reasons Jennifer listed for choosing digi stamps, they are also able to be resized, making the perfect size stamp for whatever your needs are. You can't do that with a rubber stamp! they are also CHEAP. There are many freebies out there as well, but if you decide to buy some, you can get gorgeous stamps for roughly 2-3.00 USD. You can get roughly FIVE digi stamps for the price of one decent sized rubber stamp! Now that's good news for a beginner!

One of my favorite artists for digi stamps is Mo Manning. She sells at Mo's Digital Pencil for extremely competitive rates!

So today, I'll show you a very simple card made ADORABLE by a digital stamp by Mo Manning.

I've used her "Kai in the snow" stamp (even more versatile because only your coloring decides if the baby is a boy or a girl!),,,,,,,,and how I love this precious peanut!

I've colored her with copics and cut her out with Nestabilities Labels 3 (but you could simply cut her out using anything you want) and pop dotted her up on some old DCWV scraps. The snowflakes are sizzix cut, and I've layered and popped them up as well,,,,,,a few sticky pearls and this baby is ready to send!

Hope you enjoyed! And get to using those great digi stamps out there!

For more info on this and other cards, feel free to stop by my blog!

Tuesday, October 25, 2011

Here is a video that will take you step by step on how to make this double page layout. You get to watch the process and make a layout along with me....

Digital Stamps - Love at First Sight

Digi Stamps AKA Digital Stamps were LOVE AT FIRST SIGHT for me!  My first real encounter with them was over at MyGrafico.  They had so many to choose from!  I HAD to learn more!  And today I am going to share the BASIC Basics of what I learned with you!  Nothing fantasy to start off we will have more in-depth tutorials about Digi Stamps and how different programs will work with them down the road.  This is the plain and simple stuff here, folks!  Things to get you going today!

First...there are several places to obtain freebie digi stamps which is a great way to start.  But PLEASE give create where credit is due!  If you can link or at least mention where you got the digi stamp from on your blogs!  If you are unsure maybe someone out there will know!  I have been know on occasion to post a little HELP note...you can always edit later with the updated info :)

Like I said...VERY basic Digi Stamp Talk today!

The quickest and easiest way for me (and there are many ways so don't feel like you MUST do it this way - basically ANYTHING GOES with Digi Stamps!) is to print a digital stamp from Picasa or a like-free program!  You can resize it with ease and print! 

After printing I usually use Prismacolor Colored Pencils or Watercolored Pencils or Reeves Water Color Pencils.  I have been known to also use Prismacolor Craft Markers and Martha Stewart Craft Markers as well.  I know LOTS of people who use Copics, too!  We hope to have a Copic and Digi Stamp Tutorial down the road!

I usually work with jpg or gif digital stamps but there are other file extensions they come in too such as PNGs.  All are fine to work with - I think it's just a preference thing, really.

You can use a Digi Stamp the same way you would use a Rubber/Foam/Acrylic Stamp or you can use it digitally.  I like digi stamps because they are handy, eco-friendly, easy to use, versatile, and more!

There's a great article HERE if you want to take a look - it talks more about the VERY BASICS of Digital Stamps.  Our DT will be working with Digi Stamps for our very first project posting and Challenge on November 1st!  So stay tuned!

Sunday, October 23, 2011

Using a paper trimmer

I get asked by a lot of the women in my classes how to use a paper trimmer. Many try what seems to be strange strategies to get the correct measurements. There are a lot of different types of cutters. Each has its' pros and cons. Each is slightly different but they generally operate under the same principle. Here is a little demo of how to use the measurements on your cutter to your paper to the exact size required.

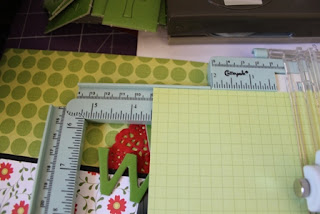
For my photo mat for this layout I needed 3 1/2' x 2 1/2'. You will see in the photo below I have lined the edge of my paper up with the 31/2' measurement on the side. That is 3 1/2' from the cutting blade, from the plastic ruler which is running in line with the main part of the cutter. 
I could go ahead and cut that piece of paper all the way to the bottom but I would rather have 2 pieces of paper (the piece I need and the left over piece) instead of 3 pieces (the piece I need and the 2 pieces cut from my original sheet).

To do this you need to locate the mark on your blade housing (the knob on your cutter which you slide up or down to cut) which indicates where the blade cuts. 
See the line on the plastic dome? That is the line on my cutter which indicates where the blade cuts to.

So if you remember, I needed a piece 3 1/2' x 2 1/2'? My paper is already poking out and lining up with the 3 1/2' mark on the arm of my cutter so I take my blade marker down to 2 1/2'. I then cut to the top of the paper. Now I need to turn my paper around and line up the cut at 90 degrees to the plastic ruler which houses the cutting blade.

I then cut with my blade upwards towards the top of the paper and the top of the cutter. I now have a piece 3  1/2' x 2 1/2'.

I hope that helps you with your measuring. Please leave a comment and ask any questions you may have regarding the use of your cutter. 

Mini book Project

A your story Home made purse pocket
Here is a PDF file you can use to trace and cut out or just print on your pattern paper. If you don't have a Your story. You can punch wholes Into the sides of the mini book and add rings or ribbon. We would love to see what you come up with. Please post a link to your project if you would like to share.

Wednesday, October 19, 2011

DT & Contributor Call

Over the past several weeks I have had many people visiting my blog and emailing me as well as hitting me up on Facebook regarding "getting into Paper Crafting" and how to start and such! I have started a new blog here craftingstart.blogspot.com - that being the focus. A Caring Crafting Community - crafters helping crafters!

I'm looking for both contributors as well as Design Team Members! If you are interested in helping please let me know.

If you are interested in being a contributor...

There will be NO deadlines! Contributors will have access to both the private Yahoo Group for conversation as well as have author access to post their own entries on the blog! We are looking for those who can commit to at least once per month postings regarding ANYTHING and EVERYTHING in the craft world. Your post can be a project, a tip, defining a term or crafters lingo, an article you have seen (as long as you link the original source), a beginners challenge that you have seen online elsewhere, ANYTHING.

If you are interested in the Design Team - here is what we are looking for...

Those who can create one project per week - if you miss a week - no biggie - we are going to be all about EASE. As of right now themes - if any - will be very loose and open to your interpretation.

Everyone likes encouragement (and to receive something) especially those who are new and something and that is what we are here for! For each person who participates in each week's challenge they will get that week's blog graphic to display on their blogs! We may have sponsors every now and again when possible.

We are looking to start this ASAP as well as have an ongoing and open call for those who would like to join-in! If you or someone you know would be interested in helping please let me know ASAP!

We are a Caring Crafting Community...the only rule is NO DRAMA - be nice to everyone! Encourage everyone! NO EXCEPTIONS - NO WARNINGS! :)

Please let me know if you are interested in either being a contributor and/or a DT Member...by emailing jennifersbliss@gmail.com (don't forget the "S" between Jennifer and Bliss)

Tuesday, October 18, 2011

About Us

Are you looking for a new hobby? Trying to get into paper crafting? Have been scrapbooking or card making for a while and looking to branch out? Or have been crafting for a while but looking to try new techniques or brush up on some that you have seen out there online? If you have answered YES to any of these questions we hope you will FOLLOW this blog and visit often! We hope you will participate and contribute in some way! Everyone's gotta start somewhere and we are the caring crafting community to help you along your way! Welcome! We are glad you are here!